

How To Change Default Rotation In Unity
Rotating an object in Unity tin can be very straightforward.
However,
Just as there are many different ways to move an object, there are many different ways to rotate 1 too.
Which means that knowing the right method to utilise, in society to get the issue that y'all want, can be a little confusing at first.
But don't worry, because in this in-depth guide I'll evidence you all of the different methods for rotating an object in Unity, and the best fourth dimension to use each of them, step by footstep.
Hither's what yous'll observe on this page:
- How to rotate an object in Unity
- How to rotate an object around a point in Unity
- How to rotate a vector in Unity
- How to rotate the photographic camera effectually an object in Unity
- How to rotate an object towards some other
- How to rotate an object over time (Lerp & Slerp)
- How to Rotate a Rigidbody with the mouse
- How to Rotate objects in 2d
How to rotate an object in Unity
In that location are a lot of dissimilar ways to rotate an object in Unity.
Some methods are elementary, some are more complex.
While others work best for certain tasks.
But don't worry,
While there are a lot of dissimilar options bachelor to you lot, many of them piece of work in like ways.
Which means that once y'all're used to the basics of rotating an object in Unity, you'll detect it easier to use some of the more advanced rotation features that Unity offers.
And then what is the basic method?
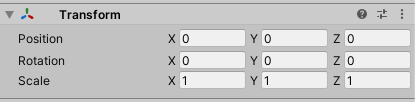
Rotation in Unity typically works by specifying an corporeality of rotation in degrees around the X, Y or Z axis of an object.
In the Inspector, you'll see an object's rotation as a Vector 3 value:
In the same way that a game object's position in the world can be set up using its Transform component…
Like this:
Vector3 newPosition = new Vector3(0, x, 0); transform.position = newPosition; An object's rotation can also be prepare directly via its Transform,
Like this:
Vector3 newRotation = new Vector3(0, 10, 0); transform.eulerAngles = newRotation; In this example, I've set the rotation of the object to 10 degrees around the Y Axis.
Rotational vector 3 values depict a degree of rotation effectually each of the iii axes, X Y and Z.
Notice, however, that I didn't set the rotation property direct like I might do when setting an object'south position, for example.
Instead, I prepare a dissimilar property, Euler Angles.
Why did I practise it like that?
Behind the scenes, Unity calculates rotation using Quaternions, significant that the rotation holding of an object is not actually a Vector 3, it'south a Quaternion.
The rotation value you meet in the Inspector is the real Quaternion rotation converted to a Vector iii value, an Euler Angle, which is rotation expressed as an XYZ value for pitch, yaw and roll.
So, when using Transform.eulerAngles, you're essentially setting and reading a converted value.
This means that if you want to set the rotation belongings straight, you'll need to utilize a Quaternion value instead.
Similar this:
// Copies another object'south rotation Quaternion objectRotation = otherObject.transform.rotation; transform.rotation = objectRotation; Or, instead of working in Quaternions, you can catechumen a Vector 3 Euler Angle rotation into a Quaternion.
Similar this:
transform.rotation = Quaternion.Euler(new Vector3(0,ten,0)); The Euler Angles property is a user-friendly mode to set and read an object'due south rotation in a format that'southward easier to read and piece of work with than Quaternions.
Quaternions vs Euler Angles in Unity
Should you utilise Quaternions or Euler Angles in Unity?
While Unity uses Quaternions behind the scenes, many of Unity's rotation functions will let yous to employ either blazon of value, either natively or past converting the value.
But which is ameliorate?
Mostly speaking, Unity uses Quaternions because they're efficient and avoid some of the problems of using Euler Angles, such as gimbal lock, which is the loss of a degree of movement when ii axes are aligned the same way.
However, Quaternions are complex and aren't designed to exist worked with directly.
Euler Angles, on the other mitt, are easier to read and work with.
Because of this, if y'all want to manually fix a rotation, or provide a rotation amount in degrees, then it will be much easier to use an Euler Angle value to do so, and you'll likely find that there's an Euler based function available for you lot to practice just that.
Yet, yous may kickoff to run into issues if you directly apply Euler Angle based rotation on a per axis ground or manually over time.
Then what'southward the respond?
It'due south best to think of Euler Angles equally a method of describing Quaternions in Unity.
They brand reading and manually setting the rotation of an object easier to do.
Nevertheless…
Trying to piece of work exclusively in Euler Angles can crusade unexpected behaviour.
For example, the converted Euler Angle value can vary, since the same Quaternion rotation can be described using different Euler values, or y'all might reintroduce gimbal lock by trying to piece of work only with Euler Angles in local variables.
In practise, when using Unity'due south built-in rotation functions, you shouldn't demand to worry about gimbal lock, even when passing in Euler Angles.
Unity will convert the Euler value and work with Quaternions behind the scenes, avoiding the typical problems associated with Eulers, while keeping their ease of apply.
So while it'due south more often than not better to use Quaternions when you can, in that location's cipher incorrect with using Euler Angles with Unity'south built-in rotation functions.
Setting the rotation of an object directly via its rotation property tin be very straightforward.
However…
While this works well for setting an absolute rotation, one time, information technology's not as useful for calculation rotation to an object.
For example, to rotate an object by a fix corporeality of degrees from its current orientation to a new one.
For that, you'll need the Rotate office.
How to Rotate an object in Unity using the Rotate function
While setting the Euler Angles belongings of an object changes its absolute rotation, in that location will frequently be times when yous want to add an corporeality of rotation to an object instead.
For example, to turn an object round by 90 degrees:
void RotateByDegrees() { Vector3 rotationToAdd = new Vector3(0, ninety, 0); transform.Rotate(rotationToAdd); } Instead of setting the rotation straight, like before, the Rotate function adds 90 degrees to the Y-Centrality every time it'due south called.
Or you lot could add rotation every frame to make an object spin smoothly.
Like this:
float degreesPerSecond = twenty; private void Update() { transform.Rotate(new Vector3(0, degreesPerSecond, 0) * Time.deltaTime); } In this example, I'm multiplying the rotation amount past Fourth dimension.deltaTime (the duration of the last frame) to make certain that the rotation is smooth and consistent.
Fifty-fifty if you lot're a beginner, you may have already multiplied values past Delta Time before in Unity, equally information technology'southward usually required for any kind of function that occurs over time, such every bit movement, rotation or lerping. This is to make sure that, fifty-fifty if the framerate changes, the amount of movement over fourth dimension remains the same.
In this case, information technology changes the amount of rotation from 20 degrees per frame to 20 degrees per 2d.
Which looks like this:
Rotate vs Rotation in Unity
Typically, Rotation in Unity refers to the rotation belongings of an object. In other words, the rotation values yous run into in the inspector, while Rotate is a function for adding an amount of rotation to an object.
So if you want to read the rotation of an object, or set it directly, you'd typically utilise the rotation property (or the Vector 3 shortcut: transform.eulerAngles). Whereas, if y'all want to apply an amount of rotation to an object, the Rotate part is designed to do exactly that.
Local rotation vs globe rotation
An object's rotation in Unity tin be relative to the world or it tin can be local, where the rotation amount is relative to the rotation of its parent object.
Both an object's local rotation and its absolute earth rotation can be read every bit properties of the object's transform.
Vector3 worldRotation = transform.eulerAngles; Vector3 localRotation = transform.localEulerAngles; A lot of the time, the local and world rotation of an object volition be the same.
This is considering, either the object that'southward being rotated doesn't have a parent object or because that parent object doesn't have any rotation practical to information technology, in which case there'southward no departure between the 2 values.
For example, if you rotate a child object past ninety degrees only don't apply any rotation to the parent object, then the world rotation and the local rotation of the child object will both be the aforementioned.
This makes sense, considering the child object has an amount of rotation practical to information technology which, when added to the parent's rotation of zilch, matches the object's real rotation in the world.
Still, if you merely apply rotation to an object'due south parent and then the local rotation value for the kid object will be unlike.
While the world rotation volition match the parent, the local rotation will be zero, equally no rotation is being applied by the child object'due south transform.
Put only, the world rotation value is the accented rotation relative to globe space. In this case, it's the rotation of the parent object plus any locally practical rotation, if at that place is any. While the local rotation value is only the extra rotation added past that object's Transform component.
So, which one should you use?
When working with rotation directly, for example when setting the rotation of an object via its Euler Bending property, you lot'll have the option to set either its earth rotation or its local rotation.
By default, when setting rotation direct, you're setting the object's world rotation:
// World Rotation transform.eulerAngles = new Vector3(0,90,0); Setting the world rotation of a kid object will rotate it into that position absolutely.
This means that if the object has a parent with any rotation, the local rotation of the child volition non be set to the new rotation value as you might expect. Instead, it volition be fix to a value that is equal to the deviation between the parent'due south rotation and the world rotation.
Basically, the local rotation will be set to any it needs to be in social club to achieve the absolute globe rotation you specified.
For instance, if you fix a child object to a earth rotation of fifty degrees around an axis, and the object'due south parent is already rotated by 10 degrees, the kid object's rotation will be set to 40 degrees, non the 50 you passed in.
The rotation of the object will technically be right, you'll become exactly what you asked for, simply y'all may get some confusing results if you apply world rotation to child objects in this way.
And then if you lot find that, when setting the rotation of an object via scripting, the Inspector values and the rotation don't match, it might be because you're setting the globe rotation of a kid object.
If, however, you only want to apply rotation locally, you lot tin can practice that by using the local rotation value:
// Local Rotation transform.localEulerAngles = new Vector3(0,90,0); A lot of the time, this won't make any difference.
When the object yous rotate doesn't have a parent, or if the parent isn't rotated, using either method will produce the same outcome.
However, there may exist times when yous'd like to position an object i way and rotate it another.
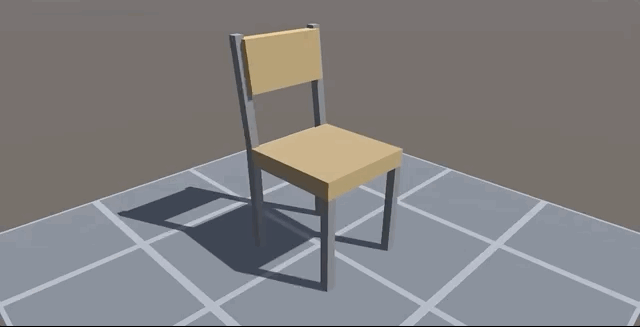
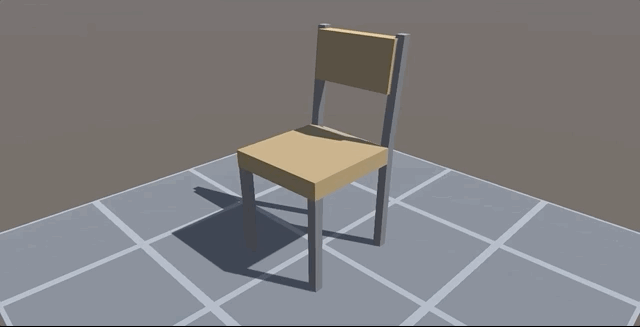
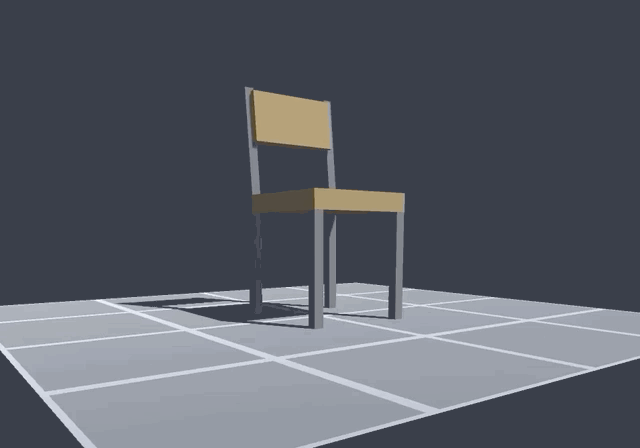
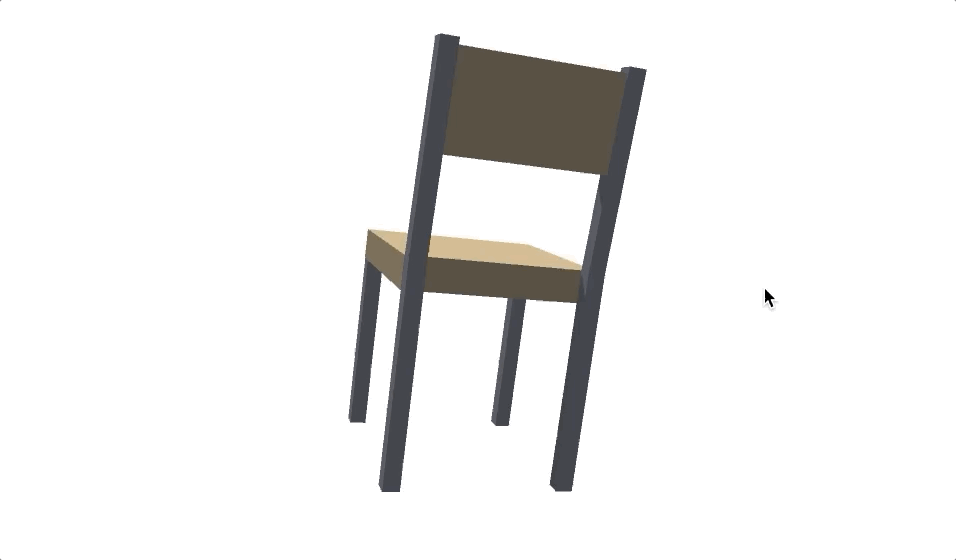
For instance, if yous want to spin an object that's already rotated, like this titled chair:
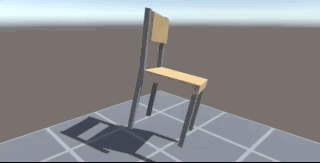
This chair is already rotated only spins on a flat Y-Centrality.
One of the easiest ways to attain this, and other rotation effects like it, is to merely nest the object inside another empty game object.

The child object can then be tilted to whatsoever local rotation you like, while the parent container can be automatically rotated on a flat Y-Axis in world infinite.
Separating the orientation of an object from its rotation like this can be useful for making rotation simpler to manage and easier to control.
Alternatively, if y'all don't desire to nest objects together, many of Unity'southward congenital-in rotation functions, such as Transform Rotate tin be overridden to operate in local or world space, recreating this outcome, without the need for additional game objects.
How to rotate an object around a point in Unity
Rotating an object in Unity around ane of its axes can be very simple.
For example, spinning a cube or turning an object upside-down can be very straightforward.
However…
As you outset to rotate more complex objects, you may begin to notice that the position of the pivot point effectually which an object rotates is just every bit important as the rotation itself.
For example, if y'all build a bones door out of some primitive shapes, and then try to rotate it by 90 degrees to open it, you'll quickly notice that something is wrong.
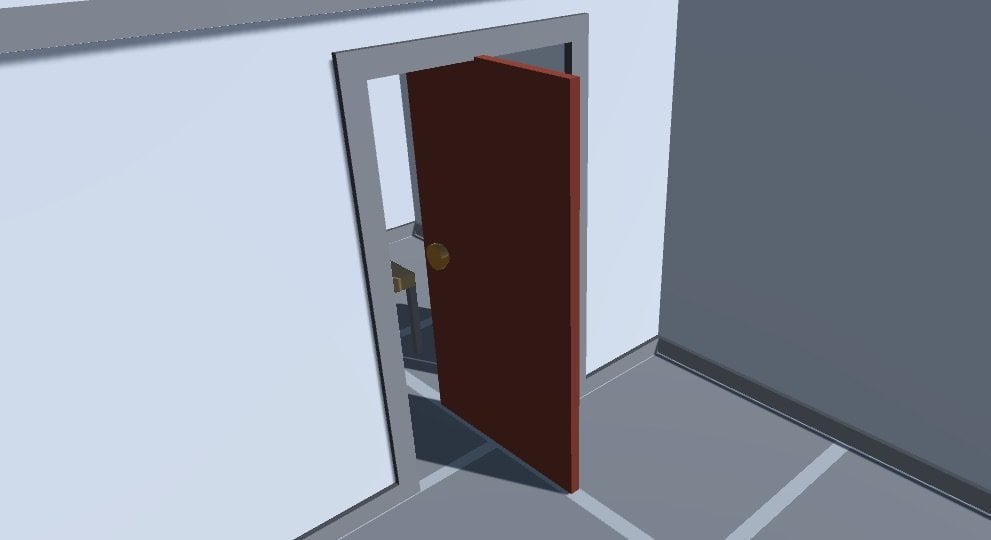
This is non how doors work.
In this instance, I've congenital a door out of primitive objects, which means that the pivot point for the parent object, the main part of the door in my case, is in the centre.
This ways that, when I rotate the object on its Y-Axis, information technology rotates around its center.
Which, as I'm sure you've noticed, is not how almost doors work.
So what tin can I do about it?
To fix it, I need to alter the pivot point of the 3D object.
How to motility the pivot betoken of a 3d object
Unremarkably, when working with 3D objects that have been created using other tools, the pivot point of the object is ready when the object is created.
For example, if I buy a door model from the Asset Store, chances are that the pivot signal will be in the right place, on the door's hinge.
I didn't do that so, instead, I need to move the pin point to a unlike position that allows me to rotate the door in the way I want.
Luckily information technology'south an easy problem to solve, by adding the game object you want to rotate every bit a kid of some other object that tin can act as a pin point.
Hither'due south how:
- Place the object you want to rotate in position
- Next, create a new game object, the pivot, and place information technology at the pivot point of the rotation. Go on it separate while you're positioning it.
- Finally, in the hierarchy, elevate the object you want to rotate on to the pivot object, making information technology a child of the pivot
Then, instead of rotating the object direct, merely rotate the pivot.
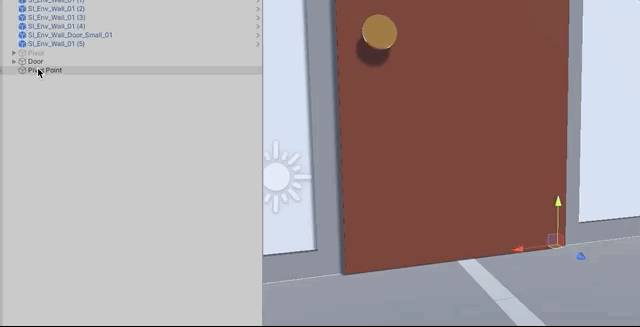
Creating a parent object is an easy style to modify the pivot point in Unity
The aforementioned technique tin can be used to eye an object'southward pivot indicate if, for whatsoever reason, it's not already in the middle of your object.
You could even nest the root object (now the pin) in some other object that doesn't rotate, and manage the local rotation of the pivot using a script.
Creating a parent object is an piece of cake way to motility the pivot signal of an object.
However, it'southward likewise possible to rotate an object effectually a indicate, without creating a parent object pivot, using Rotate Around.
How to use Rotate Around in Unity
Rotate Around works in a like way to the parent object pivot method.
Nevertheless, instead of creating a pivot betoken object and rotating information technology, the Rotate Around function takes a Vector 3 position, in world infinite, an axis to rotate around, and an bending in degrees.
Transform.RotateAround(Vector3 point, Vector3 centrality, float angle); This means that you can use Rotate Around to rotate an object either effectually a fixed point in world infinite,
Like this:
Vector3 pivotPoint = new Vector3 (-3.5f,0,0); void RotateAroundPoint() { // Rotates around the pin betoken and the Y-Axis by ninety degrees transform.RotateAround(pivotPoint, Vector3.up, xc); } Or around another object entirely,
Like this:
public Transform objectToRotateAround; void RotateAroundObject() { // Rotates around the pin object's position and the Y-Axis by 90 degrees transform.RotateAround(objectToRotateAround.position, Vector3.up, ninety); } When using Rotate Around, the get-go argument, the Vector 3 signal, is the pin of the rotation while the 2nd Vector 3, the axis, decides which direction rotation will be applied.
This is important, as it determines which road around the betoken the object will rotate.
Finally, the float value, the bending, is the amount of rotation that will be practical in degrees.
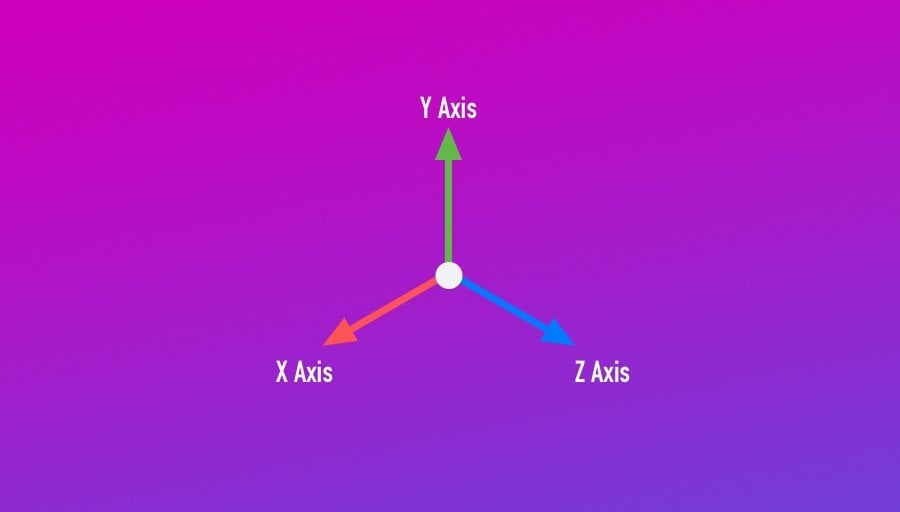
How to ascertain an axis of rotation in Unity
Several of Unity's built-in rotation functions, such as Rotate Effectually, require you to enter an axis parameter in the form of a Vector 3 value, to determine the management of the rotation that's applied.
Entering a vector, using XYZ values, creates the definition of direction that's used to determine the rotational axis.
For example, a vector of (1,0,0) would rotate around the X-Axis, while (0,1,0) rotates around the Y-Axis and (0,0,1) rotates around the Z-Axis.
Inbound a mix of values creates a direction vector that'southward proportionate to the values entered.
Withal, most of the time, you'll probably only need to enter bones Axis values which, helpfully, tin can be accessed using Vector 3 shorthand, such as Vector3.left for the X-Centrality, Vector3.up for the Y-Axis and Vector3.frontward for the Z-Axis.
While these shortcuts represent basic directions relative to world space, it's besides possible to ascertain an local directional value past referencing an object's Transform component.
So, while Vector3.upward represents the global upwardly direction, Transform.upwardly represents up in relation to a game object's Transform.
Just like the Rotate function, Rotate Effectually is only practical one time when it's called, which means if y'all desire to create continuous rotation, y'all'll need to call Rotate Around in Update, multiplying the angle value by Delta Time.
Like this:
public Transform objectToOrbit; void Update() { transform.RotateAround(objectToOrbit.position, Vector3.up, 10 * Time.deltaTime); } Rotate Around tin be used to create rotation effectually other objects and points without using the parent object method, which can be useful for rotating an object around another, without needing to rotate both of them.
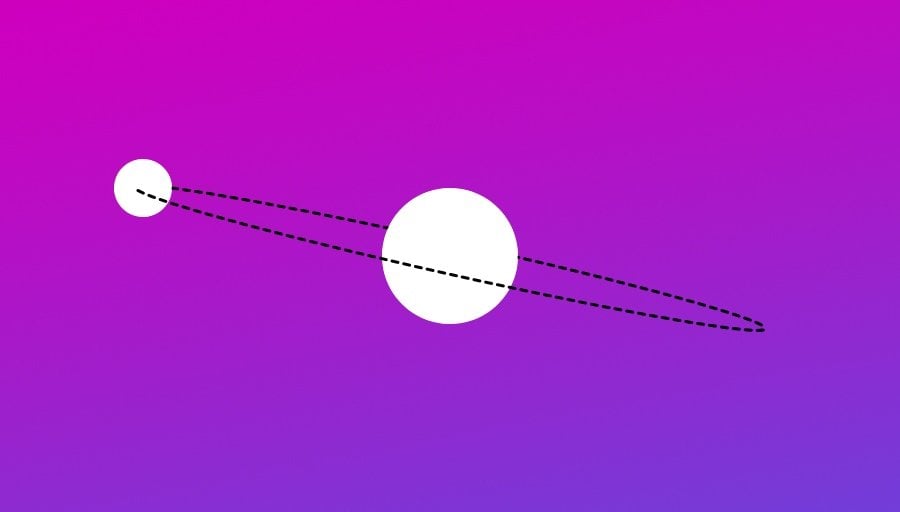
For example, I could use Rotate Around to create a basic orbit where the planet rotates around the sun and the planet's moon rotates around the planet.

Rotate Around tin can be used to create a simple planetary orbit.
In this case, the moon is a child of the planet, which means that the moon'south position is being affected by the rotation of the planet.
While Rotate Around can exist very useful and straightforward, there are a couple of drawbacks to using this method.
For example, if you use Rotate Around to move one object effectually another, and the object that's being orbited moves, it's going to affect the path of rotation.
And, while it's possible to adjust the position of the object to avoid this, at that place'southward some other problem.
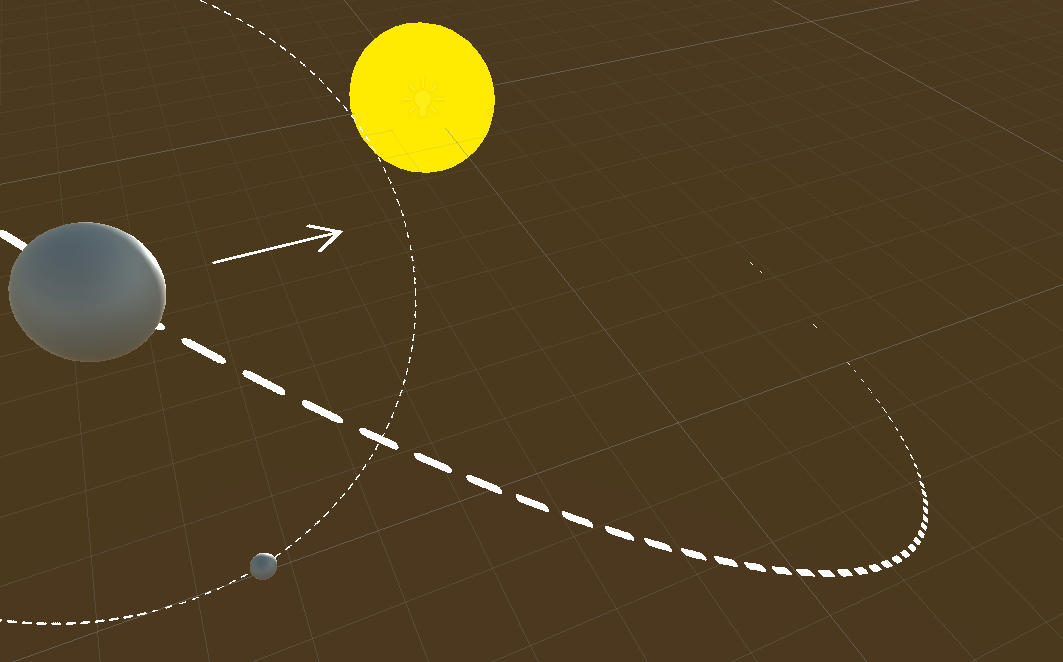
When using the Rotate Around function, the rotating object turns towards the betoken it's rotating around.
![]()
Using Rotate Around will too plough the orbiting object to face its indicate of rotation
This isn't necessarily a bad thing.
In fact, information technology tin be very useful, such as when rotating a photographic camera around an object.
Nevertheless, if you're making an object orbit some other, like in this example, information technology isn't really how planetary orbits work.
Planets tend to spin around their own axis, while their position orbits effectually the sun.
So how can you rotate one object effectually another, without turning the object towards its point of orbit?
How can you rotate an object's position around a betoken, without rotating the object itself?
Here's how…
How to rotate a vector in Unity
A vector is a geometric value that defines a management and length (which is the magnitude of the vector).
If yous've worked with any kind of movement from one position to another, or done anything with Raycasts in Unity, then you will have used vectors before. Put simply, they describe direction and distance using Vector three values.
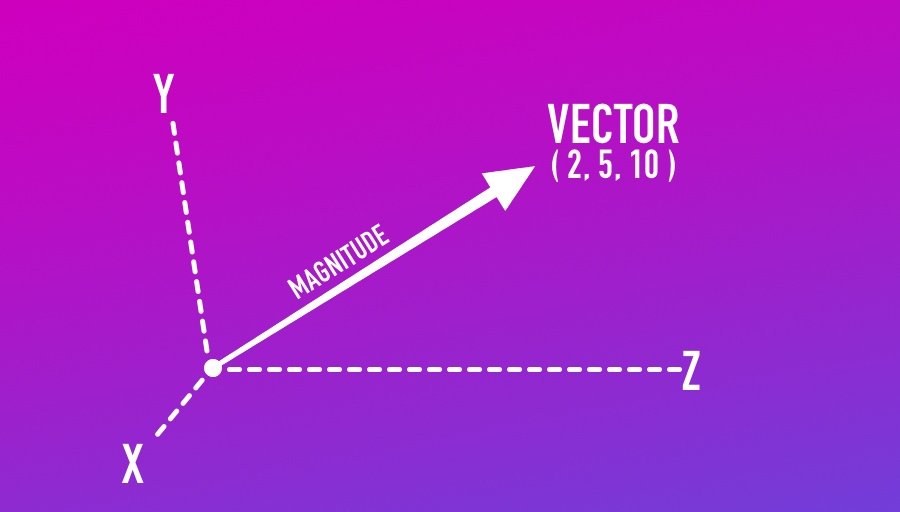
A vector is a definition of direction and distance (the vector's magnitude).
However… did you know that you can too rotate a vector by multiplying information technology past a Quaternion?
This works past multiplying the Quaternion rotation by the vector you want to rotate.
Similar this:
// Defines a point forwards from the origin by 10 units. Vector3 orbit = Vector3.forward * ten; // Rotates the orbit vector by degrees around the Y-Centrality orbit = Quaternion.Euler(0, 10, 0) * orbit; The resulting vector, which has now been rotated, can exist used to calculate where the rotated object should be in relation to the object it'southward orbiting.
Like this:
transform.position = objectToOrbit.transform.position + orbit; Which means that, using vectors, it's possible to rotate the position of i object around another in Unity, without actually rotating the object itself.
For example…
Permit'due south say that I want to orbit one object, a planet, effectually another, the dominicus, at a radius of 10 units and at a speed of 30 degrees per 2nd.
First, I need a Vector.
In this case, all I desire to exercise is ascertain a direction and a radius, which will be the distance from the sun that the planet should orbit.
For that, I can multiply Vector3.frontwards, which is shorthand for (0,0,1) by x, the radius.
That will give me a vector of (0,0,ten).
I can then rotate the vector with an bending value, which I tin add to every frame at 30 degrees per 2d, to create a circular orbit.
Like this:
public GameObject objectToOrbit; public float angle; public float radius = 10; public float degreesPerSecond=30; individual void Update() { angle += degreesPerSecond * Fourth dimension.deltaTime; if (angle > 360) { bending -= 360; } Vector3 orbit = Vector3.frontward * radius; orbit = Quaternion.Euler(0, angle, 0) * orbit; transform.position = objectToOrbit.transform.position + orbit; } What's happening here is that I'm taking a basic forward vector and rotating information technology from its starting point every frame by the angle value.
In this instance, I'k rotating around the Y-Axis, only I could besides have entered different values to produce different results.
Notation, nevertheless, that the order of multiplication matters. When Multiplying a vector by a Quaternion the Quaternion must go on the left, otherwise, this won't work (it won't even compile).
Finally, because the vector that I've created and rotated isn't fastened to anything (it basically describes a vector from the centre of the world), I've set it as an offset to the position of the orbited object, the Sun.
The event is a rotation of a vector between two virtual points, non objects, that calculates where one object should be in relation to another, creating a path of rotation. The orbiting object behaves every bit if it's nested, even so rotating the sunday has no event on the planet and it's possible to rotate the planet independently of its orbit around the sun.
In this instance, I merely rotated around the global Y-Axis, which is useful for creating an easy orbit.
However, if I wanted to, I could besides set the rotation to match a specific direction-based axis.
For example, imagine that the planet is 10 units away simply is as well several units higher than the sunday and I wanted to create a rotation based on that existing direction.
Getting the direction of the planet from the lord's day allows me to create an orbit on a tilt.
It's possible to get a direction vector between ii objects in Unity past subtracting their positions.
Like this:
Vector3 management = transform.position - objectToOrbit.transform.position; I can then summate a plane of rotation based on the starting direction and distance of the object from its point of orbit.
Similar this:
public class Orbit2 : MonoBehaviour { public GameObject objectToOrbit; public Vector3 direction; public float angle; public float radius; public float degreesPerSecond = 10; private void Start() { management = (transform.position - objectToOrbit.transform.position).normalized; radius = Vector3.Distance(objectToOrbit.transform.position, transform.position); } private void Update() { angle += degreesPerSecond * Time.deltaTime; if (angle > 360) { bending -= 360; } Vector3 orbit = Vector3.frontwards * radius; orbit = Quaternion.LookRotation(direction) * Quaternion.Euler(0, angle, 0) * orbit; transform.position = objectToOrbit.transform.position + orbit; } } In this example, I'm measuring the direction and the distance of the object in Start, which gives me my orbit management and radius.
I'one thousand also normalising the vector, which limits its magnitude to 1. This basically limits the vector to directional information only, and while y'all don't need to do this, I'k doing it so that I tin can multiply the direction vector by the radius variable, assuasive me to change it later.
Once I have a direction vector, instead of rotating information technology around the globe's Y-Axis, which would cause the planet to orbit somewhere above the sun, I'thou creating a new Quaternion angle using the Quaternion Await Rotation role instead. Expect Rotation basically turns a direction vector into a Quaternion angle.
And then, to become the combined angle, I can multiply the Quaternion direction angle (which is the corporeality of tilt) by the angle of rotation (the bending float variable) to combine the two angles.
I'm nonetheless using the bones forrad vector equally a starting point, however now, instead of but multiplying information technology past the bending of rotation, I'thou also rotating it by the bending of management as well.
This is useful for creating automatic planet orbits equally now, all I need to do is position the object relative to the point or object I want it to orbit, and the script will summate a trajectory around that object.
Planets tin can be given a more natural-looking orbit by rotating on an axis that's based on their direction.
And if I desire to change the axis of the orbit, I tin practise so by just entering the angle into the X-Centrality or the Z-centrality instead.
This method is nifty for creating a path of rotation effectually a unmarried axis.
Nonetheless, there will often be times when you don't desire to just rotate i way effectually an object.
For example, what if you want to freely rotate a photographic camera around the player using the mouse, or the keyboard, or using controller thumbsticks?
How can you lot pass input axes into a rotation function, to give the player control of the photographic camera?
How to rotate the photographic camera around an object in Unity
Being able to freely rotate the camera around an object with the mouse or other controls is a very mutual mechanic in many games; For instance, to control the position of the camera around a player in tertiary-person.
In the previous example, moving a planet effectually the lord's day, I moved one object around some other on a single plane of rotation, around the Y-Centrality.
Rotating a camera around an object works in a like way except, instead of a unmarried stock-still path, the actor is able to freely move the camera effectually the object using two axes from the combined vertical and horizontal movements of the mouse, a controller thumbstick or keyboard keys.
And so how do you do information technology?
I of the easiest ways to rotate the camera around an object is by using the Rotate Around function.
Using Rotate Around is an like shooting fish in a barrel way to give the thespian photographic camera control with the mouse.
The Rotate Around function rotates an object around another point, relative to its distance, while turning the object to face the pivot.
This makes it ideal for creating a mouse orbit camera, as it keeps the camera looking at the object.
Similar this:
public course CameraRotateAround : MonoBehaviour { public Transform objectToOrbit; public float radius; void Update() { transform.position = objectToOrbit.position - (transform.forward * radius); transform.RotateAround(objectToOrbit.position, Vector3.up, Input.GetAxis("Mouse X")); transform.RotateAround(objectToOrbit.position, transform.right, Input.GetAxis("Mouse Y")); } } This works, first, past moving the camera so that it faces the target object, but set back by a distance that's equal to the radius variable.
Find that I'm using the forward vector of the camera object that this script is attached to, non Vector3.forward, which is the world forward, to keep the camera in position.
And so, using the Rotate Around function, the horizontal input of the mouse (its X-Axis) rotates around the target object around the Y-Axis, which moves the camera left and right around the player.
While the vertical movement of the mouse moves the camera relative to its own X-Axis, moving information technology up and down.
Using Rotate Around, the object that's being rotated volition plough towards the point that it's rotating effectually. For this particular utilize instance, this is ideal, equally it ways that the camera will look towards the object it'southward rotating effectually automatically, providing a simple method of rotating a photographic camera around an object.
It works well and it's straightforward.
However, it is also possible to rotate the camera around an object without using the Rotate Around part.
Here'due south how to practise that…
How to rotate the photographic camera effectually an object without using Rotate Around
While the Rotate Around function is a straightforward way to rotate the camera around an object, it's not the only method.
Simply as information technology was possible to orbit an object around a single centrality by rotating a management vector, the same method can be used to create 360 spherical rotation around a thespian or object.
The benefit of using this method over Rotate Around is that the rotation is entirely position based. Neither the object or the pivot bespeak will be rotated as a upshot, which tin can be useful if, for whatsoever reason, you desire to move an object around another with the mouse, simply don't desire the object itself to rotate.
Like before it works by defining a basic vector, such as the forwards vector, and then rotating information technology into position using inputs from the mouse.
Like this:
public class Orbit3 : MonoBehaviour { public GameObject actor; public bladder angleX; public bladder angleY; public float radius = x; private void Update() { angleX += Input.GetAxis("Mouse X"); angleY = Mathf.Clamp(angleY -= Input.GetAxis("Mouse Y"), -89, 89); radius = Mathf.Clamp(radius -= Input.mouseScrollDelta.y, 1, 10); if (angleX > 360) { angleX -= 360; } else if (angleX < 0) { angleX += 360; } Vector3 orbit = Vector3.forward * radius; orbit = Quaternion.Euler(angleY, angleX, 0) * orbit; transform.position = player.transform.position + orbit; transform.LookAt(player.transform.position); } } In this example, the X and Y movements of the mouse are added to two angle variables, angle X and angle Y.
To limit vertical movement, the Y angle is clamped at 89 degrees in both directions, to cease the photographic camera from going over the top of the role player and circular again.
The 10 angle is as well checked to see if it has moved past 360 degrees, or has moved beneath 0 degrees, in order to keep the value within a normal range.
This check isn't strictly necessary, as the rotation role will work just fine without it, however keeping the value within a typical rotation range prevents a potential, although highly unlikely, problem of reaching the limit of the value type, likewise every bit making the value easy to understand at a glance.
Finally, a frontward vector, multiplied by a altitude that's equal to the radius, is rotated by the two angles, and the position of the camera is and then moved to match.
Because this method of moving a camera around an object doesn't affect the object's rotation, I've used the Transform Look At role, which turns an object to face the direction of a Transform.
In this example, the Look At office is helpful for making sure that the camera is actually facing the player way when it's rotated.
All the same, it's not the only choice for turning one object towards another…
How to rotate an object towards some other
There are several methods available for rotating one object towards some other.
Which one you use depends on how you lot desire the object to rotate towards its target.
How to use Look At
Transform Look At, which instantly snaps an object's rotation to face up the transform of another object, is probably the easiest method of rotating an object towards a specific bespeak.
Like this:
public Transform objectToLookAt; void Update() { transform.LookAt(objectToLookAt); } It takes a single Transform parameter, or a world position every bit a Vector 3, and will turn the object towards the target as soon as information technology'south called.
Wait At is one of the easiest ways to make i object await at another.
Look At is great every bit a quick and easy mode to snap an object's rotation towards another object or towards another point in the world.
Still, considering it's a function of an object's Transform, it automatically rotates towards the object when you call it.
And while this can exist extremely useful, there may be times when you lot want to calculate the rotation value required to look at an object, without actually looking at it.
The Quaternion Look Rotation function tin can help you practice that.
How to employ Expect Rotation
Look Rotation basically turns a management vector into a rotation value.
This can be useful for calculating the rotation value towards an object or bespeak, but without actually turning the object to indicate at information technology.
For example, I could calculate the direction vector of two points by subtracting their positions.
Like this:
Vector3 management = objectToLookAt.transform.position - transform.position; I could so pass that direction vector into the Look Rotation part to get a matching Quaternion rotation value.
Similar this:
Quaternion targetRotation = Quaternion.LookRotation(direction); I now have the rotation required to look at an object as a Quaternion value.
Why would I want to exercise this?
Why wouldn't I but use Look At to turn the object to its target?
While Look At can be used to instantly turn an object to face another object or point, depending on what yous're trying to do, you may not want the rotation to happen immediately.
Instead, you might want the object to rotate towards the direction of its target slowly and smoothly.
Following the direction of the target, instead of snapping to it.
And for that, Look Rotation tin exist used to give you a target value for an object to smoothly rotate towards.
So, now that yous have a target, how can you lot smoothly rotate an object?
How to slowly rotate towards another object
Many examples of smoothly rotating an object towards another tend to employ Lerp, which stands for linear interpolation, or Slerp, meaning spherical interpolation, to achieve this kind of eased movement.
However… this isn't really what interpolation functions such as Lerp and Slerp are used for.
Lerp and Slerp are typically used to comport out a unmarried move over a period of time, such as a rotation from one stock-still position to another, or a movement between two points.
- More info: The right mode to use Lerp in Unity (with examples)
However, continuous motility, such equally an pointer post-obit the direction of a target, isn't really what Lerp or Slerp are designed to do.
If using interpolation functions in this way gets you results that you similar, then become ahead!
But… for continuously following the management of a target, there's a better function to utilise, Rotate Towards.
Here's how…
How to utilise Rotate Towards
Rotate Towards is a Quaternion function that works in a similar way to Movement Towards, which you may accept used before to move an object closer to a target.
It looks like this:
Quaternion.RotateTowards(Quaternion startRotation, Quaternion targetRotation, float maxDegreesDelta); In the same way that Motion Towards moves an object towards a target position a niggling scrap each frame, Rotate Towards turns an object towards a target rotation each frame, without overshooting when it gets there.
The consequence is a smoothed movement towards a target rotation.
Rotate Towards turns an object towards a target each frame.
The target rotation is the direction vector of the object you lot want to rotate towards, which tin can be worked out by subtracting the target's position from the object's position.
The Look Rotation function and so turns the direction vector into a Quaternion rotation.
Like this:
Vector3 direction = objectToLookAt.transform.position - transform.position; Quaternion targetRotation = Quaternion.LookRotation(management); How fast Rotate Towards works depends on the Max Degrees Delta of the part, which limits how much the object can rotate in a unmarried step.
Passing a degree value that's multiplied by Delta Time into the Max Degrees Delta parameter sets the speed of the rotation in degrees per 2d.
Similar this:
public Transform objectToLookAt; void Update() { bladder degreesPerSecond = 90 * Time.deltaTime; Vector3 direction = objectToLookAt.transform.position - transform.position; Quaternion targetRotation = Quaternion.LookRotation(direction); transform.rotation = Quaternion.RotateTowards(transform.rotation, targetRotation, degreesPerSecond); } The Rotate Toward part is platonic for continuous movement, as information technology's e'er rotating towards a target at a specific speed.
All the same, if you desire to perform a single rotation movement over a fixed amount of time, for example, to rotate an object 90 degrees over two seconds, so Lerp and Slerp can assist you to do exactly that.
How to rotate an object over fourth dimension (Lerp & Slerp)
While Rotate Towards continuously rotates an object towards a target at a set speed, you can apply Lerp or Slerp to rotate an object past a fixed amount over a set menstruation of time.
This works past taking a start rotation, such as the object's ain rotation at the commencement of the movement, a target rotation, which is where y'all want the object to end up, and a fourth dimension value.
The fourth dimension value, when calculated as time elapsed divided by elapsing, defines where the object should be during the movement. And so, for instance, at the halfway signal (when time elapsed divided by duration equals 0.5) the rotation will be in the centre between the offset and target rotations.
And so, in one case the movement has finished and the time has elapsed, the object is snapped into its final rotation.
And so when might you apply this?
Quaternion Lerp and Slerp are useful for rotating an object to a new rotation over a fixed amount of time.
For example, rotating an object around 90 degrees taking half a second,
Similar this:
public form RotateObject : MonoBehaviour { bladder lerpDuration = 0.5f; bool rotating; void Update() { if (Input.GetMouseButtonDown(0) && !rotating) { StartCoroutine(Rotate90()); } } IEnumerator Rotate90() { rotating = true; float timeElapsed = 0; Quaternion startRotation = transform.rotation; Quaternion targetRotation = transform.rotation * Quaternion.Euler(0, 90, 0); while (timeElapsed < lerpDuration) { transform.rotation = Quaternion.Slerp(startRotation, targetRotation, timeElapsed / lerpDuration); timeElapsed += Fourth dimension.deltaTime; yield return zero; } transform.rotation = targetRotation; rotating = imitation; } } Because the rotation movement has a start, an stop, and is carried out over a number of frames, it works all-time when placed in a Coroutine.
- More info: Coroutines in Unity, how and when to utilize them
Y'all may have likewise noticed that, in this example, I used Quaternion Slerp, not Lerp.
While the two functions are easily interchangeable, as both have the aforementioned parameters, there is a slight departure betwixt the two methods.
The difference between Lerp and Slerp for Rotation
When interpolating rotation, you'll have the option to interpolate linearly, using Lerp, or spherically using Slerp.
Most of the time y'all'll notice very niggling difference betwixt the two methods. The principal divergence is that the length of the directional vector remains constant during Slerp while Lerp, which is linear, can be more efficient to perform.

Lerp (green) vs Slerp (red)
Then which should you utilize?
Generally speaking, using Slerp volition produce a more accurate path of rotation, peculiarly when the difference between angles is large.
However… y'all may desire to balance this against performance, as Lerp, which can be more efficient, will produce similar results in about cases and, for minor angles, volition barely exist noticeable at all.
Quaternion Lerp and Slerp are all-time used for smoothly moving an object from ane rotation to another.
Yet, like all of the previous examples in this guide, they work past setting the rotation of the object direct, basically emulating smoothen movement with calculated values.
But what if you don't want to directly set the orientation of the object?
What if, instead of rotating an object in a measured style, you lot actually desire to spin it round with energy?
While rotation, just like movement, can exist calculated and applied exactly, it's as well possible to apply rotation to a Rigidbody as a physical force.
Here's how information technology works…
How to Rotate a Rigidbody with the mouse
Physics-based rotation, which is created using angular force and elevate, can be a groovy way to create natural object rotation.
Information technology works past applying an amount of force, which causes an object to rotate, afterwards which angular drag slows the object downward bringing it to a stop.
This can be used for all kinds of mechanics; Spinning an inventory object past clicking and dragging the mouse, for example.
And then how tin can you use it?
How to use the Add together Torque function
The Add Torque function adds an amount of rotational force to a Rigidbody, taking a Vector 3 value to define the management of the rotation in world space:
Rigidbody.AddTorque(Vector3 torque); And so how can y'all employ information technology?
Let's say I want to create a floating object that tin can be spun around by clicking and dragging the mouse, similar to how you might view and rotate an item in a game.
For this to work, I'll demand to attach a Rigidbody to the object I want to spin.
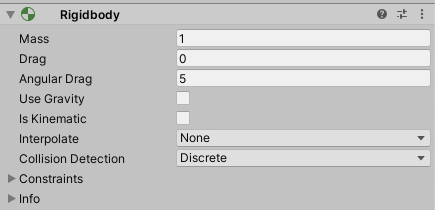
In this case, I've disabled gravity and increased the object's angular elevate.
I've turned off the Rigidbody'south gravity then that the object doesn't autumn out of the air, and I've given the object 5 units of angular drag and then that it volition stop fairly quickly later being rotated.
Then, to rotate the object using the mouse, all I need to do is pass in the Horizontal and Vertical axes of the mouse input into the Add together Torque function whenever the mouse button is down.
Like this:
public class RotateRigidbody : MonoBehaviour { public Rigidbody rb; public float strength = 100; public bladder rotX; public bladder rotY; bool rotate; individual void Update() { if (Input.GetMouseButton(0)) { rotate = truthful; rotX = Input.GetAxis("Mouse 10") * force; rotY = Input.GetAxis("Mouse Y") * strength; } else { rotate = false; } } void FixedUpdate() { if (rotate) { rb.AddTorque(rotY, -rotX, 0); } } } When the mouse button is held downwards, I'k storing the directional movement values of the mouse in float variables and multiplying them past a strength value.
Then, in the Add Torque function, I'm applying the vertical mouse value to create rotational force around the 10-Axis, while the horizontal mouse value creates force effectually the Y-Axis.
The end result is smoothen, natural rotation, that'southward applied when clicking and dragging the mouse.
The Add Torque function is great for moving Physics objects around naturally with the mouse.
Y'all'll notice that I've dissever the functionality of this script beyond both the Update and Fixed Update calls, connecting the two indirectly using variables.
This is because, while the physics-based Add Torque function should exist in Fixed Update, and then that the application of strength is in sync with the physics steps of the game, the input checks, which are framerate dependent, need to be in Update to piece of work properly.
Splitting the functions like this prevents the different frequencies of Update and Fixed Update from affecting each other.
How to Rotate objects in 2D
A lot of the techniques used for rotating objects in 3D in Unity likewise utilise when rotating in 2D.
This is because, generally speaking, normal game objects in Unity are the same in both 2D and 3D, with the only deviation existence that the forrad vector, Z, usually represents depth in 2D.
Considering of this, in order to get the results you desire, it helps to exist mindful of which axis an object is being rotated around.
Luckily, notwithstanding, most rotation functions in Unity permit yous to specify which mode is considered to exist upwards, allowing you to change the orientation of the rotation if you need to.
Such as the Look At function which, in this example is set to face the actor in 2nd, with the forward axis set equally upward.
public Transform thespian; void Update() { transform.LookAt(actor, Vector3.forward); } However, in some cases, when working with 2d objects, even changing the orientation of the rotation may not get you the results y'all want. In which case you may find it easier to only rotate around the object'due south Z-Axis using a single float value.
- How to rotate a 2D object to look at the mouse
Which is, in fact, exactly how rotation works with 2nd Rigidbody objects.
How to rotate a Rigidbody in 2D
While many objects rotate in similar ways in both 3D and 2nd there are some specific differences when applying physics in 2nd.
The 2D and 3D physics engines in Unity are separate. Which means that rotating a physics-based object in second tin can really be much simpler than it is in 3D.
This is because true second rotation only occurs effectually a single axis. As a result, Rigidbody rotation is stored, and can exist applied, using a single float value, which represents the amount of rotation in degrees clockwise or counter-clockwise.
Like this:
public Rigidbody2D rb; void Update() { // spins a 2d physics object clockwise at x degrees per second rb.AddTorque(10 * Time.deltaTime); } Now information technology's your turn
At present I want to hear from you…
How have yous dealt with rotation in Unity?
Have yous institute it piece of cake, or has it given you constant headaches?
And what tips take you lot learned that you know others will detect useful?
Whatever it is, let me know below by leaving a comment.

My favourite time-saving Unity assets
Rewired (the best input management organisation)
Rewired is an input management asset that extends Unity's default input system, the Input Manager, adding much needed improvements and support for modern devices. Put simply, it's much more avant-garde than the default Input Manager and more than reliable than Unity's new Input System. When I tested both systems, I found Rewired to exist surprisingly easy to use and fully featured, so I can understand why everyone loves it.
DOTween Pro (should be built into Unity)
An asset so useful, information technology should already be congenital into Unity. Except it's not. DOTween Pro is an animation and timing tool that allows you to animate anything in Unity. You tin can move, fade, scale, rotate without writing Coroutines or Lerp functions.
Easy Save (there's no reason non to use information technology)
Easy Salve makes managing game saves and file serialization extremely piece of cake in Unity. And so much so that, for the time information technology would take to build a salvage system, vs the toll of buying Easy Relieve, I don't recommend making your own save system since Easy Salve already exists.
Source: https://gamedevbeginner.com/how-to-rotate-in-unity-complete-beginners-guide/
Posted by: upchurchyouren.blogspot.com
0 Response to "How To Change Default Rotation In Unity"
Post a Comment